VNIS uses a wide range of error codes to identify issues in handling request traffic. By default, these error pages are provided by VNIS; however, custom pages help you provide a consistent brand experience for your users.
In any plan you can customize and brand these pages for your whole account or for specific domains. You can design custom pages to appear during a security challenge or when an error occurred.
Prepare
Step 1: Create a custom page
Before adding a custom page to your VNIS account, you will need to design, code, and host that page on your own web server.
You can use the following custom template to start building your page:
<!DOCTYPE html>
<html>
<body>

<h1>My First Heading</h1>

<p>My first paragraph.</p>

</body>
</html>
To display a custom page for each error, create a separate page per error. For example, to create a custom error page for both Block, Rate-limit, 500-class, Challenge and Maintenance, you must design and publish separate pages.
Step 2(options): Select your custom error tokens
When designing your JS/Captcha custom error page, you must include one page-specific custom error token. Each custom error token provides diagnostic information that appears on the error page.
The following tables list each custom error token grouped by the applicable custom page.
| Token |
Available to |
| ::JS_BOX:: | JS challenge |
| ::CAPTCHA_BOX:: | Captha challenge |
JS/Captcha challenge custom example
Here is sample code for JS challenge custom page without styling:
<!DOCTYPE html>
<html>
<head>
</head>
<body>
    <h1>Daniel test javascript custom page</h1>
    <h2>::JS_BOX::</h2>
</body>
</html>
Here is sample code for Captcha challenge custom page without styling:
<!DOCTYPE html>
<html>
<head>
</head>
<body>
    <h1>Daniel test captcha custom page</h1>
    <h2>::CAPTCHA_BOX::</h2>
</body>
</html>
Custom page size
Your custom page cannot be blank and cannot exceed 1.5 MB.
Create custom page
You can make custom pages that can be made readily available when common website events happen.
To make custom error pages, navigate to ‘ Multi CDN’ > ‘Custom page’, and then select one of the custom pages and press the ‘Create’ button. This corresponds to the purpose in which the page will be used.
Custom page is an account-level feature. Pages created here will be available to all the domains in your account.

On the Create custom page’ screen, you are asked to fill in:
- Name: The name of the custom error page
- Address of customized page: URL of the custom page you customized in your origin server
Then click ‘Preview’ to preview your custom page, make sure that you are serving the custom page with an HTTP 200 status code. Then click ‘Save’ to save a custom page.

All created custom pages are summarized in the ‘Custom page’ table.

You may update a custom page by clicking the ‘Settings’ (gear) button. You may also delete a custom page by clicking the ‘Delete’ (trash) button.
How to activate created custom pages
You can find the controls for custom pages on ‘ Multi CDN’ > ‘General settings’.
You need to set the target domain from the ‘ Operation level panel’.
On the ‘ Custom page’ box, click the ‘Settings’ (gear) button.
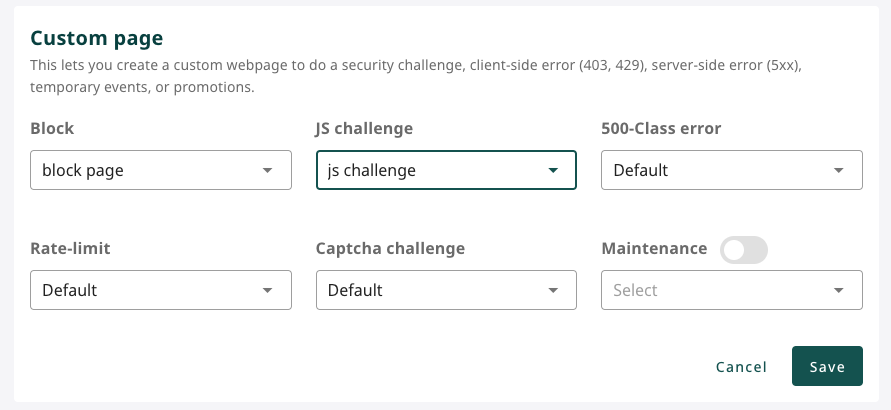
To activate ‘Block’ pages:
Simply choose a ‘Block’ page you created from the drop-down menu, and then click ‘Save’. All blocked requests will be redirected to this page.
To activate ‘Rate-limit’ pages:
Simply choose a ‘Rate-limit’ page you created from the drop-down menu, and then click ‘Save’. All blocked requests will be redirected to this page.
To activate ‘JS challenge’ pages:
Simply choose a ‘JS challenge’ page you created from the drop-down menu, and then click ‘Save’. All blocked requests will be redirected to this page.
To activate ‘Captcha challenge’ pages:
Simply choose a ‘Captcha challenge’ page you created from the drop-down menu, and then click ‘Save’. All blocked requests will be redirected to this page.
To activate ‘500-class error’ pages:
Simply choose a ‘500-class error’ page you created from the drop-down menu, and then click ‘Save’. Visitors will be redirected to this page when your host server encounters an error.
To activate ‘Maintenance error’ pages:
First, switch the ‘Maintenance’ on, then choose a ‘Maintenance error’ page you created from the drop-down menu, and then click ‘Save’. All requests will be redirected to this page when this functionality is switched on.